Automations in Motion.io
From the moment a client is ready to sign, through feedback and delivery, to final approval and launch, Motion.io's built-in automations help eliminate manual tasks and streamline client and team collaboration in your projects.
This article will explain how Motion.io's built-in automations work and provide instructions for creating them in your projects and templates.
📣 Note: This guide covers how Motion.io's built-in automations work. If you'd like to create automations that connect Motion.io to external software tools you're using, our Zapier integration gives you the power to do so. Click here to learn more.
How Automations Work
Motion.io's built-in automations enable you to specify an action (or actions) that automatically take place when other events (called "triggers") occur in one of your projects or templates.

📣 Note: We generally recommend setting up automations within your Motion.io project templates. Automations added to a template will automatically carry over to any new projects created from it—saving you time and ensuring consistency without the need to start from scratch.
How to Create Automations
Whether you create automations in active projects or templates, the process is virtually identical. To create automations, open a project or template and click "Automations" in the top navigation bar.
On this page, you can create new automations and view any existing automations you or your team members added to project or template already.

If you're new to automations, Motion.io provides pre-built templates to help you get started. To access them, click "Show Suggestions" and click "Use Automation" to add it to your project or template.

Step-by-Step Instructions
If you'd like to create an automation from scratch, click the "Add new" button to bring up the automation builder. The instructions below will walk you through each step.
👋 Tip: To help your team quickly understand what each automation does in a project, you can give it a custom name. This is completely optional—if you leave the name field blank, Motion.io will automatically generate one for you when the automation is saved.

Step 1: Configure Trigger Event(s)
Every automation in Motion.io starts with at least one trigger—an event that occurs within a project and initiates the automation workflow. You can set up a single trigger or use multiple triggers. If you add more than one, all trigger conditions must be met for the automation to run.

When configuring trigger events, you must specify:
- Whether the trigger should apply to a task, stage, form block, or project
- The specific task, stage, or form block you want the trigger to reference
- A condition that must be met in the task, stage, or form block you referenced for the trigger to fire (for example, a specific task/stage being completed, activated, or archived)
📣 Note: Because "Project" triggers must reference the project they are associated with, the option to select a different project when configuring this trigger option is grayed out.
Step 2: Add a Delay (Optional)
While optional, adding delays to your automation workflows can be especially helpful for projects with a defined timeline. Delays allow you to schedule actions more strategically—ensuring tasks and updates happen at the right moment in your project workflows.
By default, the Delay field in new automations is set to “None.” To add a delay, simply enter a number and choose the time unit (hours, days, weeks, or months) from the dropdowns.

Here are a few examples of how delays can be used:
- Trigger a task prompting clients to schedule a check-in call after they've worked with you for X weeks
- Archive completed tasks or stages after Y days to keep your client’s portal clean and focused
- Give your team Z hours to customize portal pages before clients can access them
By default, the Delay field in new automations is set to “None.” To add a delay, simply enter a number and choose the time unit (hours, days, weeks, or months) from the dropdowns.
Step 3: Add Automation Action(s)
The final step before saving your automation is to define at least one action—what you want Motion.io to do automatically when the trigger conditions are met. Motion.io supports actions such as sending email notifications, activating or completing tasks, moving or updating stages, and showing or hiding portal pages.

Depending on the action you select, Motion.io will prompt you to provide additional details—such as the name of a task or stage to activate, or the email address for a notification—before you can save the automation.

Reviewing & Troubleshooting Automations
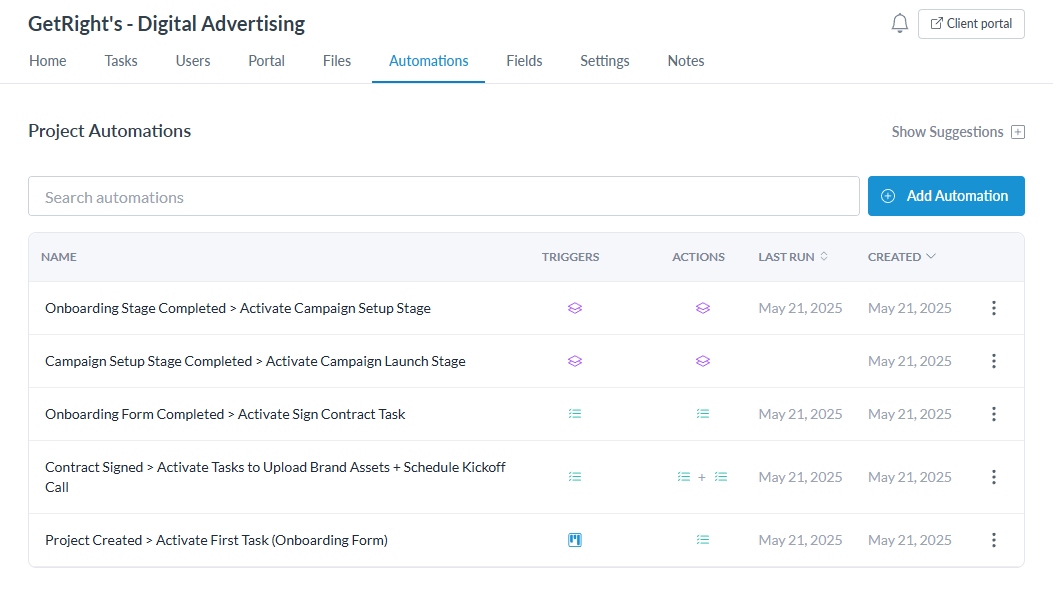
As mentioned, the Automations tab in your projects and templates provides a complete overview of all automations contained within them.
Reviewing Automations
In the overview table, hovering over the icons in the Triggers and Actions columns lets you quickly see what type of trigger or action is being used, along with the specific task, stage, project, or form block it references.

Troubleshooting Automations
The Last Run column is especially helpful if you need to troubleshoot an automation or verify that it ran as expected.

Clicking the date shown for an automation in the Last Run column will display additional details—such as the exact time it ran and which actions were executed. If no date appears, it means the automation hasn't run yet.

Clicking on the date of a specific automation in the "Last Run" column will provide you additional information about the specific time that automation ran and the actions it executed. If you there is not a date listed, it means the automation has not run yet.
📣 Note: The date listed in the "Last Run" column applies only to automations that ran in that specific project. Because automations can only be triggered in active projects, the "Last Run" column of the automations overview in your templates will always remain blank.
▶️ See out automations in action on our YouTube tutorial!