Adding Custom Fields to Contracts
By adding custom fields to your Motion.io contracts, you can prefill values unique to each project and avoid clients or team members entering information manually.
Examples of information you can use custom fields to pre-populate include:
- Business names and addresses
- Names and email addresses for primary contacts
- Project-specific information like pricing, due dates, and deliverables
This article will walk through the process of adding custom fields to the contracts you send to clients in Motion.io.
📢 Note: To follow this guide, you must already have created at least one custom field in your Motion.io account. Click here if you're new to custom fields and want help getting started.
How to Add Custom Fields to Contracts
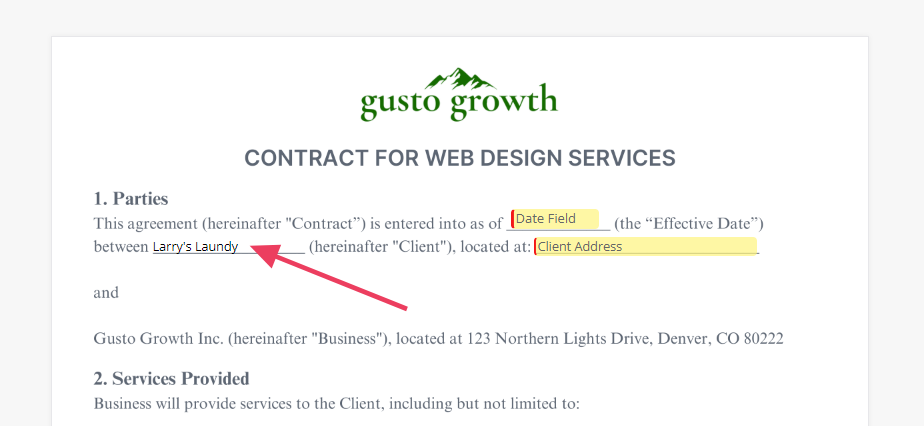
In the "Contracts" page of your Motion.io admin dashboard, select the contract to which you wish to add custom fields and click "Edit Fields" to open the field editor. In Motion.io's contracts, custom fields can only be utilized with the "TextField" field option.

👋 Tip: In addition to using custom field slugs in the "API ID," you can also enter Motion.io's default IDs of {{PROJECT_NAME}} , {{CLIENT_NAME}} , and {{CLIENT_EMAIL}} to prefill those respective values in a contract.
In the editor, select the text field you want to add one of your custom fields to and expand the "Advanced Settings" dropdown. Then, under "API ID," replace the default value with the slug of a custom field in your Motion.io account, exit out of the modal and click "Save" in the "Edit Contract" slideout.
How to Populate the Same Custom Field Multiple Times
If your contract requires the same piece of client information—like a business address—to appear multiple times, you don’t need to ask your client to fill it out over and over again. Motion.io makes it easy to reuse the same custom field value throughout a contract using a simple naming convention.
Instructions
To populate the same custom field value multiple times in a single contract, follow the same setup process you'd use for any custom field—but with one key difference: each additional instance of the field must use a slightly modified slug by appending an underscore and a number (e.g., _2 , _3 , etc.).

Setup Example
Let’s say your client’s business address should appear three times in a contract, and you want to automatically populate it in each place without requiring your client to enter it manually. Here’s how you’d set it up:
- First Instance
- Add a text field to the contract.
- Set the API ID to the standard slug for your custom field:
{{BUSINESS-ADDRESS}}
- Second Instance
- Add another text field where the address should appear again.
- Set the API ID to:
{{BUSINESS-ADDRESS_2}}
- Third Instance
- Add a third text field where the address should appear.
- Set the API ID to:
{{BUSINESS-ADDRESS_3}}
Each of these fields will automatically pull in the value from the original {{BUSINESS-ADDRESS}} field, making it so your client never has to manually enter the business address you already have on file.
👋 Tip: After setting up a contract template to populate custom field values, it’s a good idea to test it internally before sending it to clients. To do this, attach the contract to a task in a sample project and send it to a test client you've added to that project.
▶️ Check out our YouTube video to see the process in action!